


Think outside the box (of dye, that is) with these creative Easter egg decorating ideas.

31 Cute Easter Egg Decorating Ideas You Need to Try


Updated on Mar. 11, 2025
1
/
31
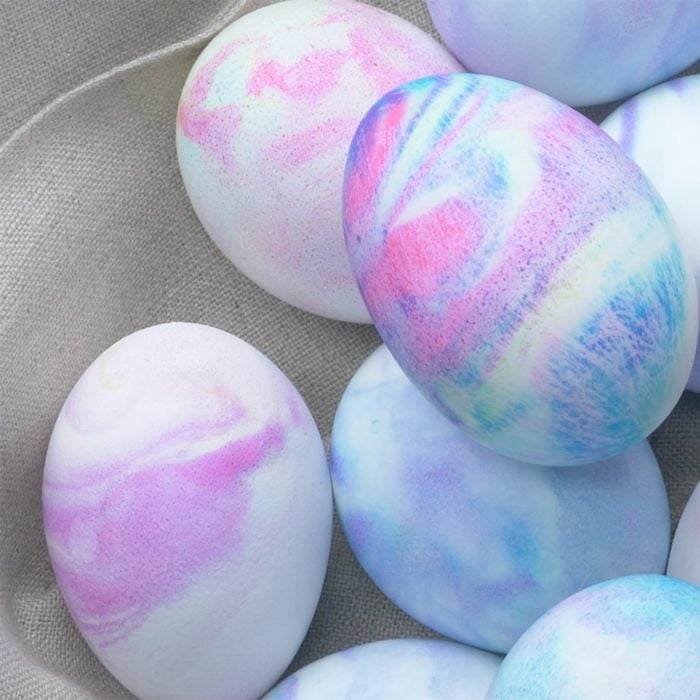
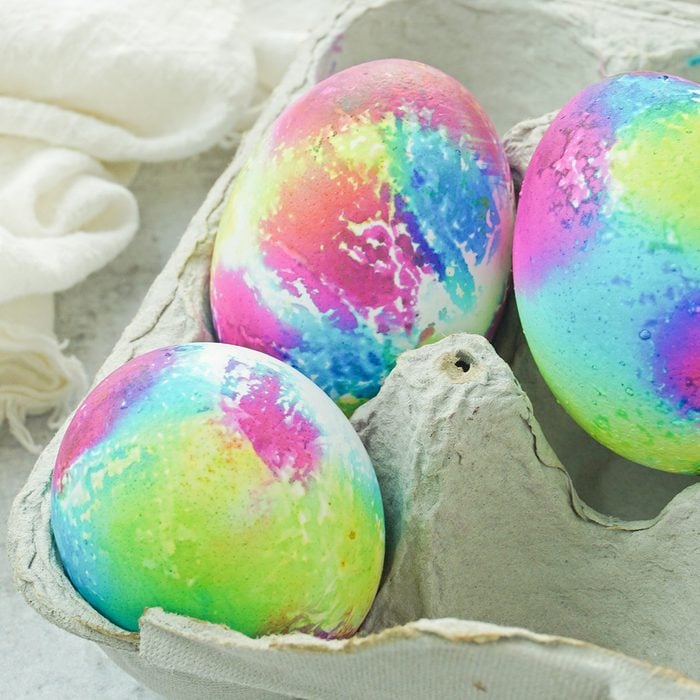
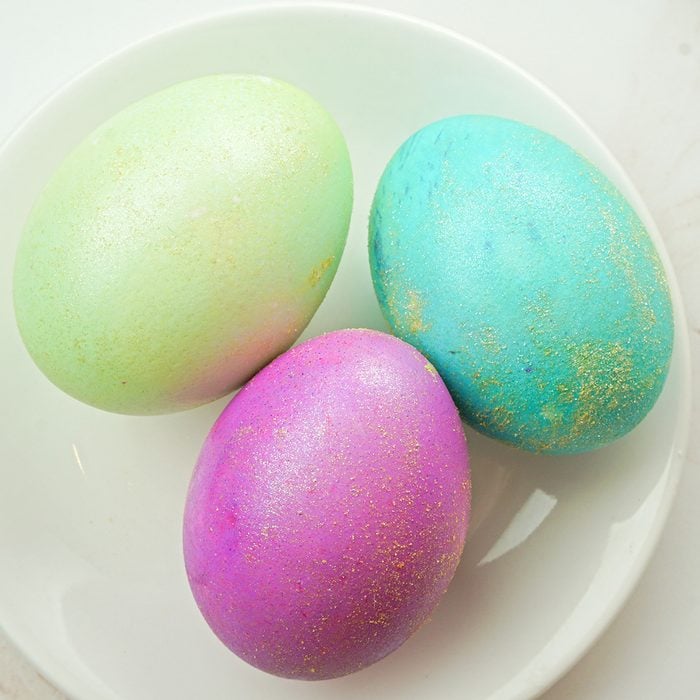
Use Cool Whip or Shaving Cream
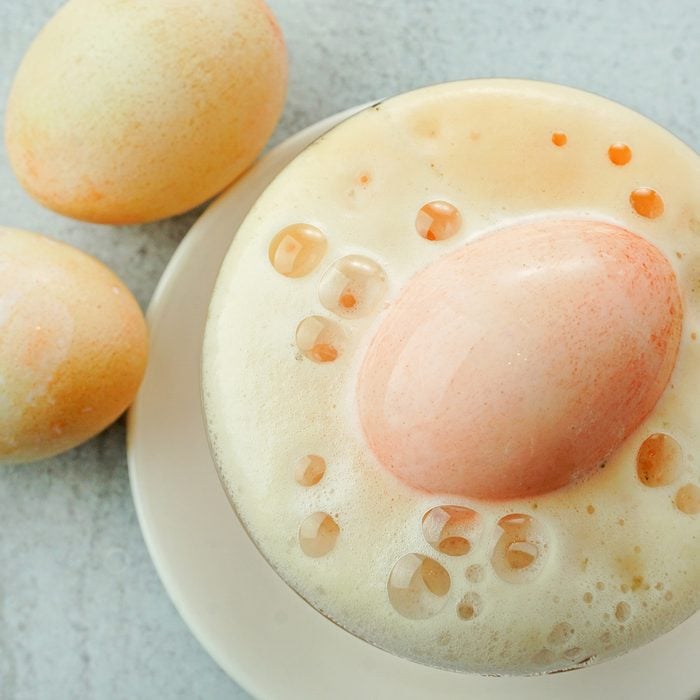
It doesn’t get much easier (or more fun) than dying eggs in Cool Whip. And it’s a perfect way to get the little ones involved. Simply add a few drops of food coloring into a bowl full of Cool Whip and swirl the color with a toothpick. Then, roll your eggs in the mixture until they’re completely covered, and allow the color to set for about 30 minutes. Rinsing the eggs will reveal a beautiful pastel marbling that will look amazing on your Easter dinner table.
If you’d like a brighter coloring, let the eggs sit in the dyed dessert topping for up to an hour. If you don’t need your eggs to be food-safe, you can use shaving cream instead of Cool Whip.
2
/
31

Mark Them with Tattoos
Temporary tattoos aren’t just for little kids and birthday parties. Turn them into your next DIY Easter decoration! For this Easter egg decorating idea, apply themed temporary tattoos (we love these Easter tattoos from Amazon) to an egg’s surface the way you would to skin. You may have to smooth the tattoo onto the egg a bit once the tattoo’s backing has been removed.
3
/
31

Hand Paint the Eggs
Get in touch with your natural side by painting simple designs—like florals, greenery or even a chicken—on hard-boiled brown eggs. If you don’t want to pay the extra few bucks, you can also paint white eggs. (And yes, there is a reason for the difference in price between brown eggs and white eggs.)
If you enjoy painting eggs, take a look at these other Easter crafts using plastic Easter eggs.
4
/
31
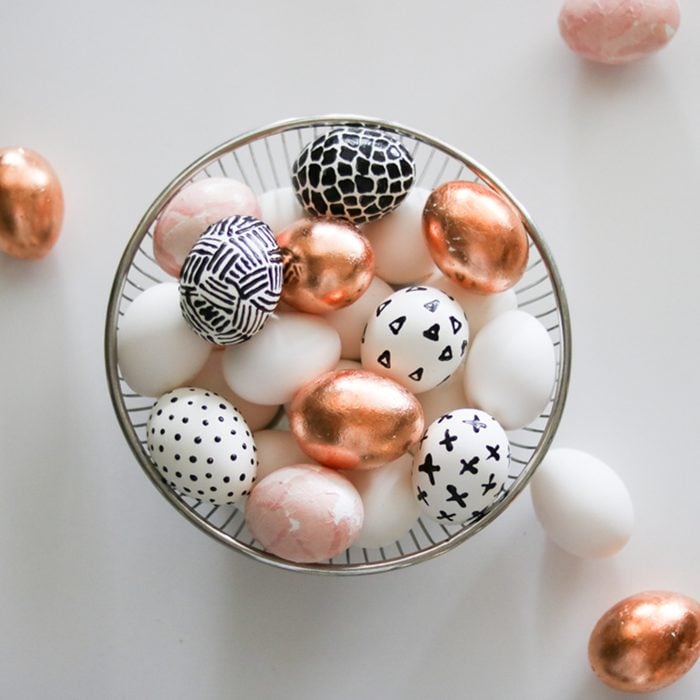
Cover Them with Gold Leaf
If you’re all about elegance, these metallic eggs from Lily Ardor will be right up your alley. The eggs are made with copper and gold leaf, which can be found online or at your local craft stores. For a more modern vibe, add pops of geometric design with 3D black paint.
5
/
31

Stamp the Shells
Pull out your kid’s stamps to make pretty patterned Easter eggs. Use a thin brush to paint gel food coloring on a mini rubber stamp (stick with mini stamps, so the full shape can fit on the shell). Then lay the eggs flat or in an egg cup to dry. And while you’re decorating for Easter, consider putting together a crafty DIY table centerpiece to go with the eggs.
6
/
31

Add Bunny Ears and Faces
Hippity, hoppity, Easter’s on its way—especially when these cute bunny-inspired eggs line your basket. To make them, first dye Easter eggs any color you like. Then, cut out ears from a piece of felt and hot glue them to the narrow end of your egg. Finish the look by drawing on a simple face of eyes, nose and whiskers. How cute is that?!
Don’t stop with bunnies. You can make other springtime baby animals like chicks, lambs or frogs. Try using cotton balls and different colors of construction paper or felt.
7
/
31
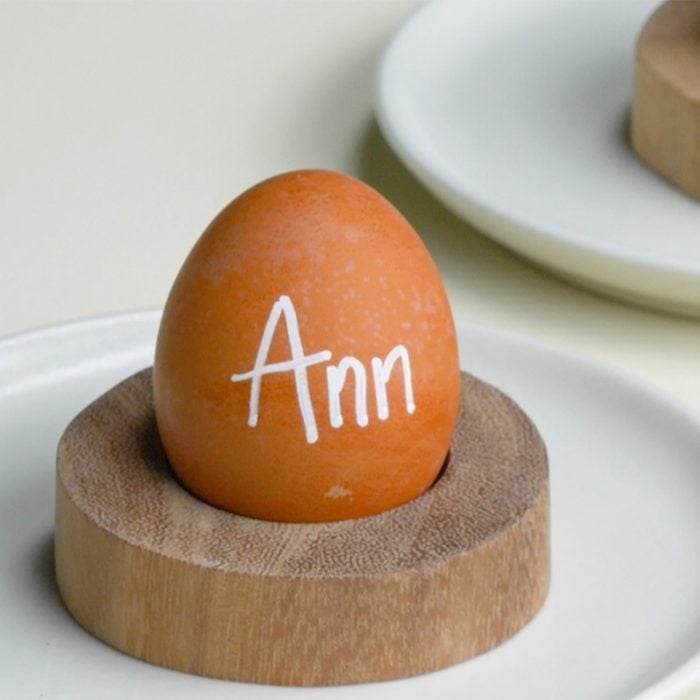
Try Food Coloring Markers
When it comes to holiday entertaining, sometimes easier is better. These food coloring markers make writing and drawing on dyed eggs a breeze. For an Easter-themed place card, use the marker to write your guests’ names on an egg and display it at their seat with an egg cup or napkin ring.
8
/
31

Opt for Natural Food Dyes
Kick the chemical colors to the curb and make your own natural Easter egg dye; you can get pretty hues using ingredients you already have in your kitchen.
Simply boil different foods like beets, blueberries, turmeric root and onion skins in 2 cups of water each for up to 30 minutes. Strain the water, let it cool, add a tablespoon of white vinegar for every cup of liquid and dunk away! No matter what type of dye you use, follow these tips to make sure your dyed Easter eggs are safe to eat.
9
/
31
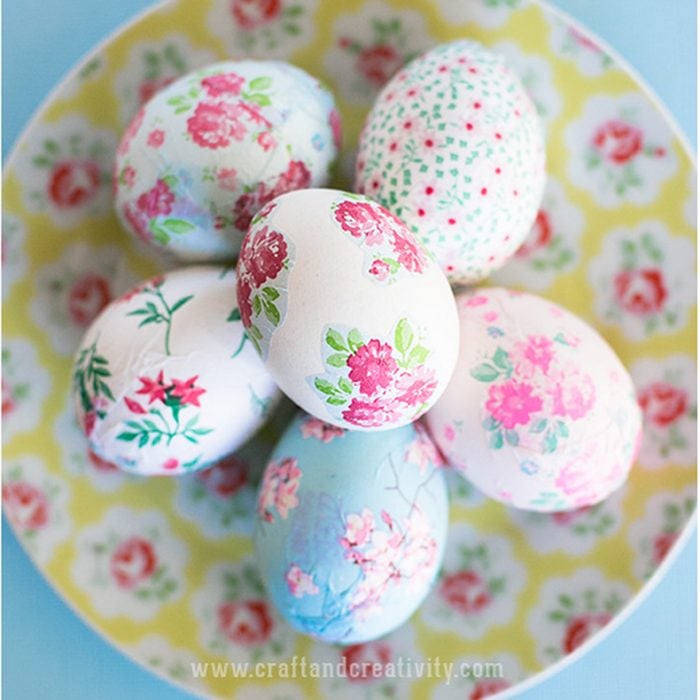
Try Decoupage with Fabric Cutouts
Pretty pastels + a bevy of blossoms = some serious spring vibes. To make these eggs from Craft and Creativity, wrap floral fabric around each egg, then brush over them with a decoupage lacquer (like Mod Podge) to hold everything in place.
10
/
31
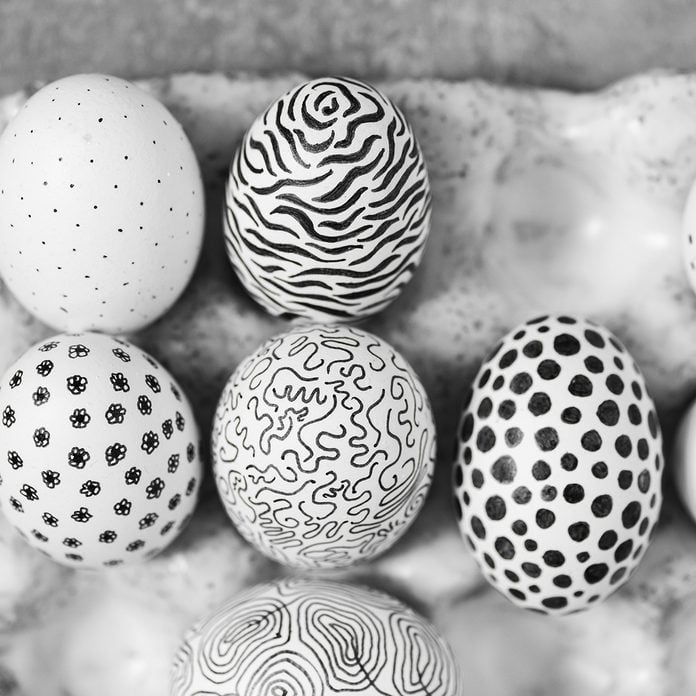
Use a Black Sharpie
Feeling edgy? Skip the bold colors and instead use a thin black marker to draw on plain, white eggs. We’re loving these polka dots, zebra stripes, florals and more. If you’re organizing an amazing Easter egg hunt, add a challenge to the rules: The kids who find the zebra-striped eggs win a prize.
11
/
31
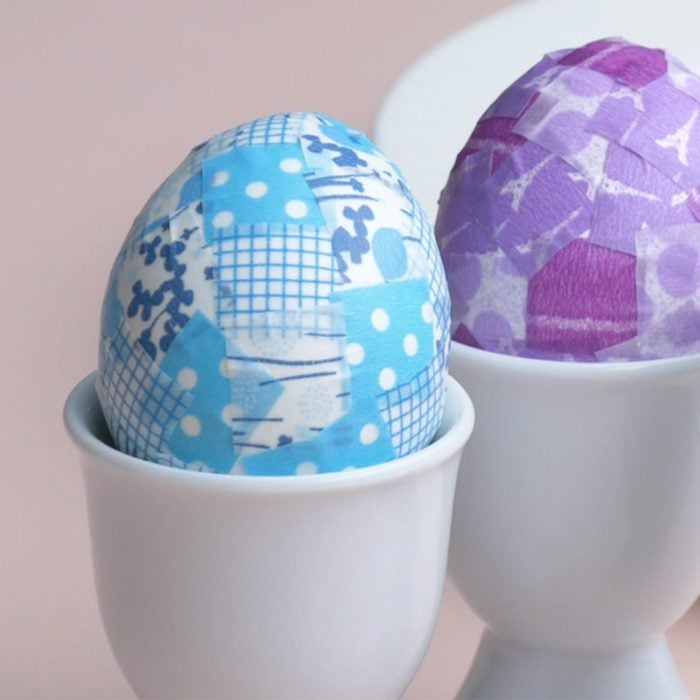
Cover Them with Washi Tape
Deck out your dozen with strips of prettily patterned washi tape. Mix and match shapes and shades for a beautifully bright batch (or try a mosaic by scattering tiny pieces around the shell).
12
/
31
Use Silk Scarves or Ties
Silk tie eggs are stunning, and a good way to upcycle old fabrics you don’t know what to do with. According to Martha Stewart’s website, all you need is silk, white cloth, white vinegar and rubber bands. You’ll dunk the wrapped eggs in a water and vinegar bath, then boil and cool them. If you’re hosting Easter dinner, pile the eggs in a natural nest for a stylish spring centerpiece, then accessorize them with pretty plates and other dreamy decor.
13
/
31

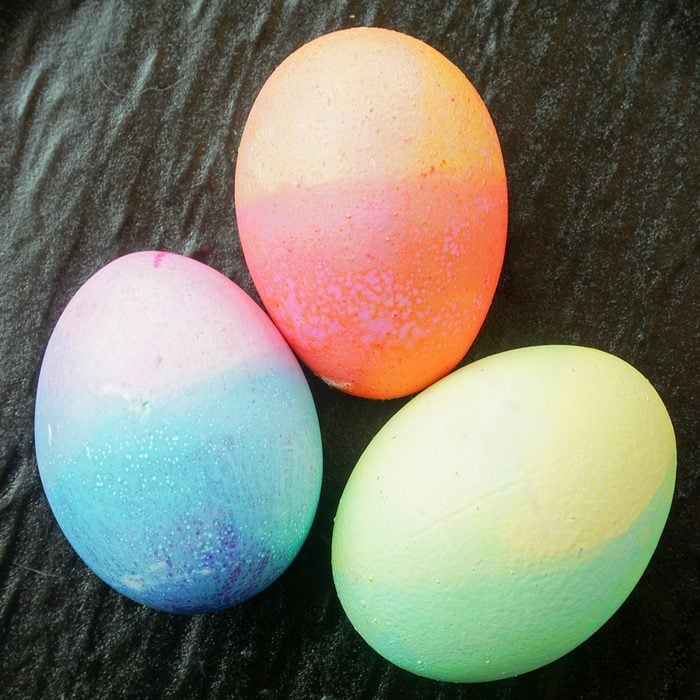
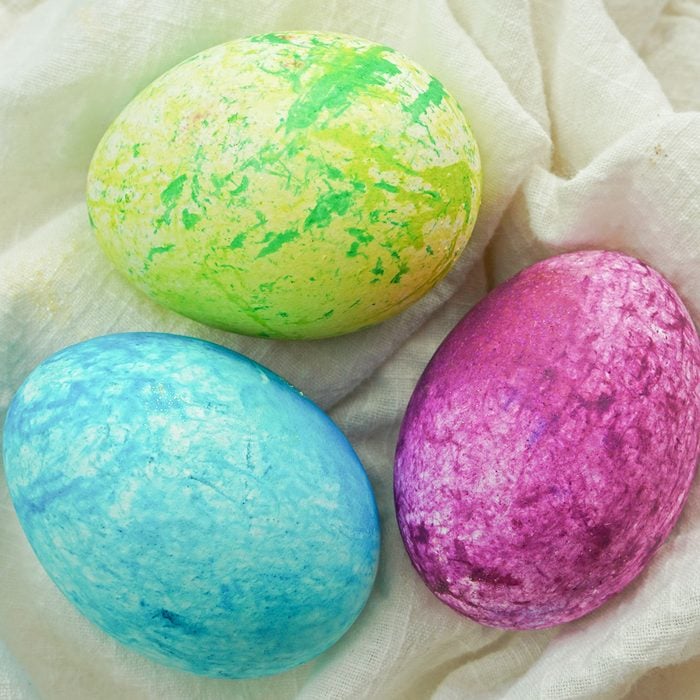
Give Them a Neon Glow
Sneak into your kid’s school supply stash for this awesome egg decorating hack from Salty Canary. And as fun as it may be to go crazy with pink, orange and yellow highlighters, when it comes to actually peeling the eggs to eat them? Eh, that can be tricky. To make it easier, try this quick trick for peeling hard-boiled eggs.
14
/
31
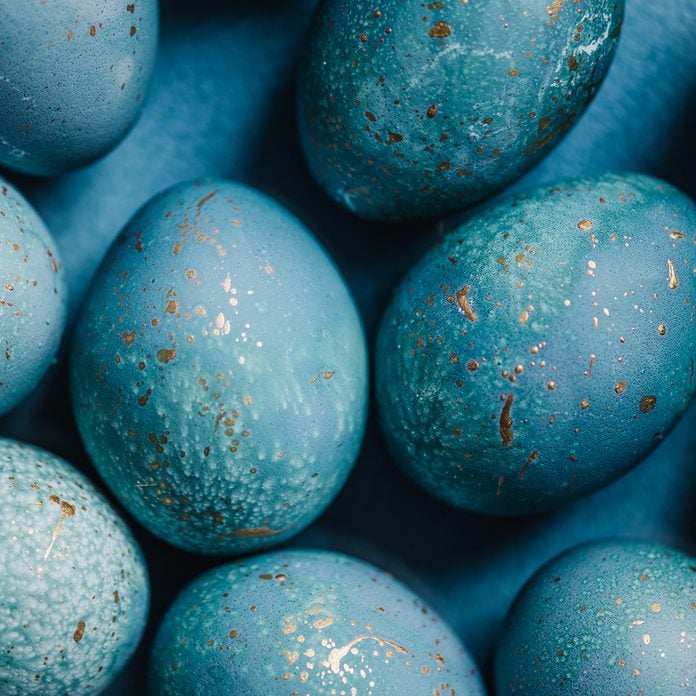
Speckle Them with Paint
Some birds are known for their stunning speckled eggs—and you can bring that magic to your Easter table too. Start by dyeing your eggs a base color (we love robin’s-egg blue for spring!). Then, dip a paint brush into a dark dye color—like black or purple—and gently flick the brush over the eggs to create speckles. For extra glam, use gold paint.
15
/
31
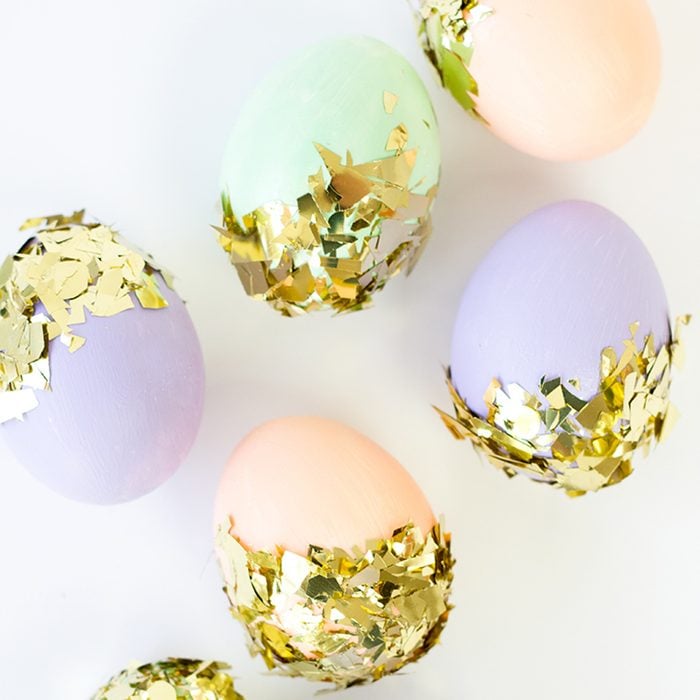
Cover Them with Confetti
For super sparkly spheres, use this idea from Studio DIY and coat your eggs in confetti. To make them look even more pro, start with a pastel painted shell for an added pop.
16
/
31
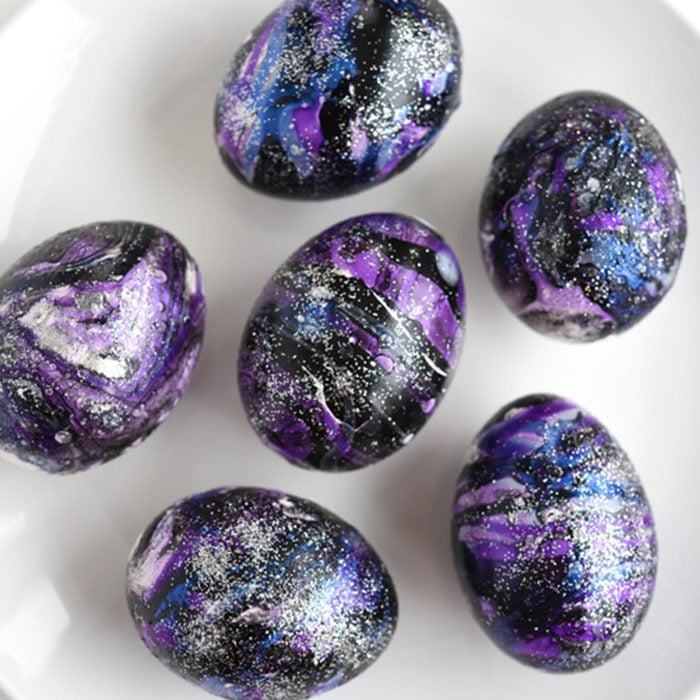
Swirl in Nail Polish
Pardon the pun but these galaxy eggs from One Little Project are, well, out of this world. Inspired by the night sky, they’re “dyed” with nail polish and then splattered with starry sparkles for an extraterrestrial effect.
17
/
31
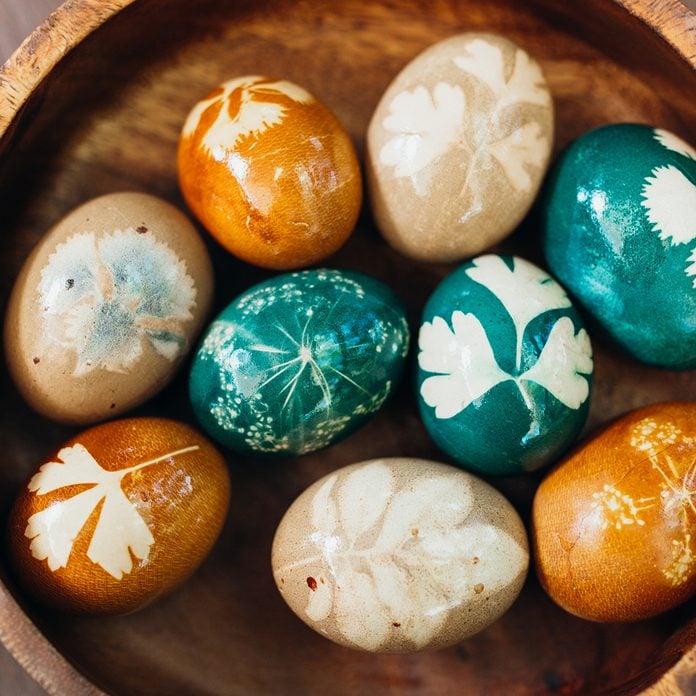
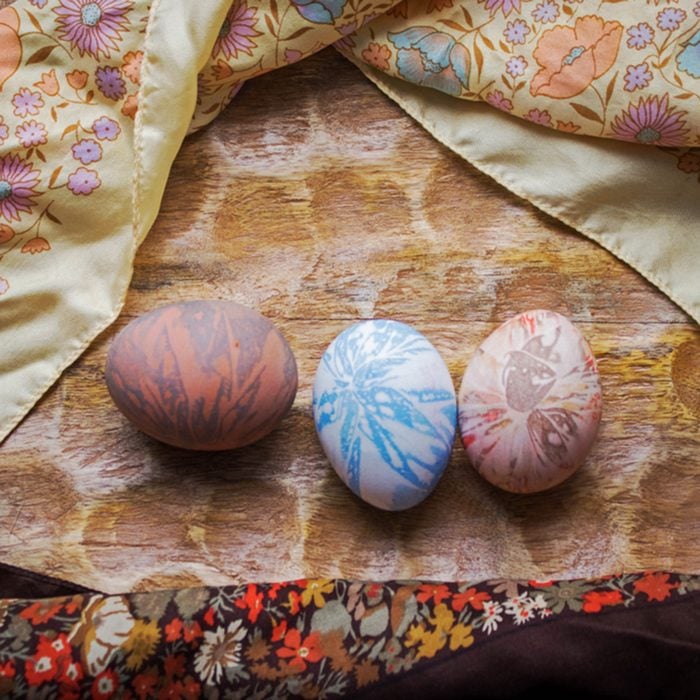
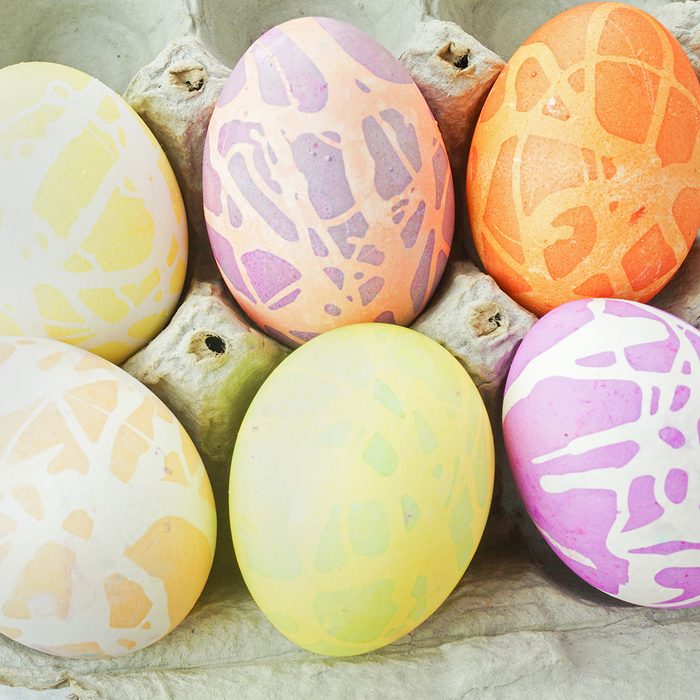
Use Leaf, Herb and Flower Cuttings
You don’t need to leave your kitchen to find gorgeous egg-spiration. These dyed beauties rely on the leaves of common herbs for their rustic look. To make, lay an herb cutting atop hard-boiled white eggs. Then, gently place the egg inside of a piece of clean nylon stocking, ensuring the herb leaves are still in place. Dye your eggs as desired, then remove them from the stocking and peel off the herb stencil.
18
/
31

Try Calligraphy Pens
Pretty place card or edible Easter egg? The correct answer would be both. Printable Crush shows us how to give the eggs just a splash of color at the bottom, then take a calligraphy pen and hand-letter the names of your guests. You can also write festive phrases instead, like “Hoppy Easter” or “How Egg-cellent.”
19
/
31
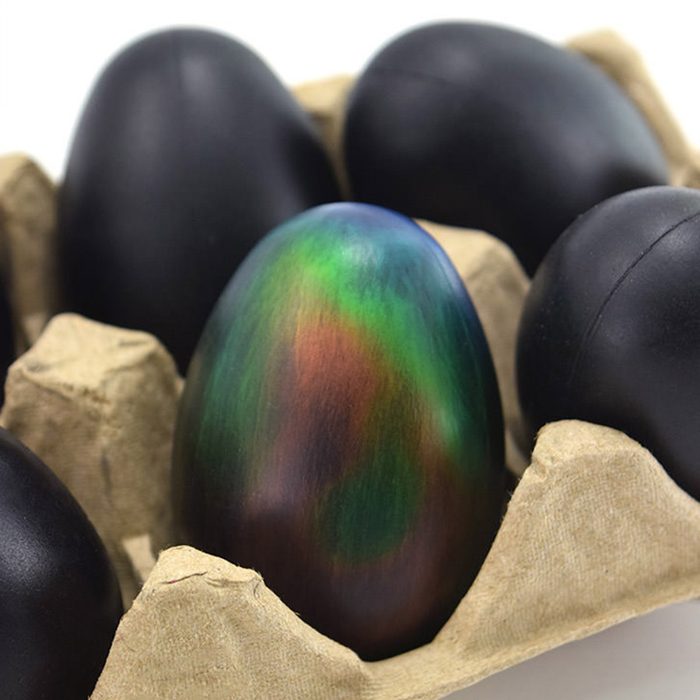
Use Color-Changing Mood Paint
Cue all the nostalgia. Just like some of our favorite throwback school lunch recipes, these color-changing eggs from Dream a Little Bigger will take you right back to mood rings and the ’90s. When you pick one up, the warmth of your hand transforms the plain black shell into a rainbow of shimmering shades.
Not born in the ’90s? Here’s what Easter looked like the decade you were born.
20
/
31
Wrap Them in a Paper Towel
This is a perfect one if you have little ones in your life. This idea from The Make Your Own Zone blog involves wrapping the eggs in damp paper towels covered in drops of food dye followed by a piece of plastic wrap. After letting the eggs rest for 30 minutes, remove the plastic wrap and paper towel to reveal gorgeous tie-dyed eggs.
21
/
31
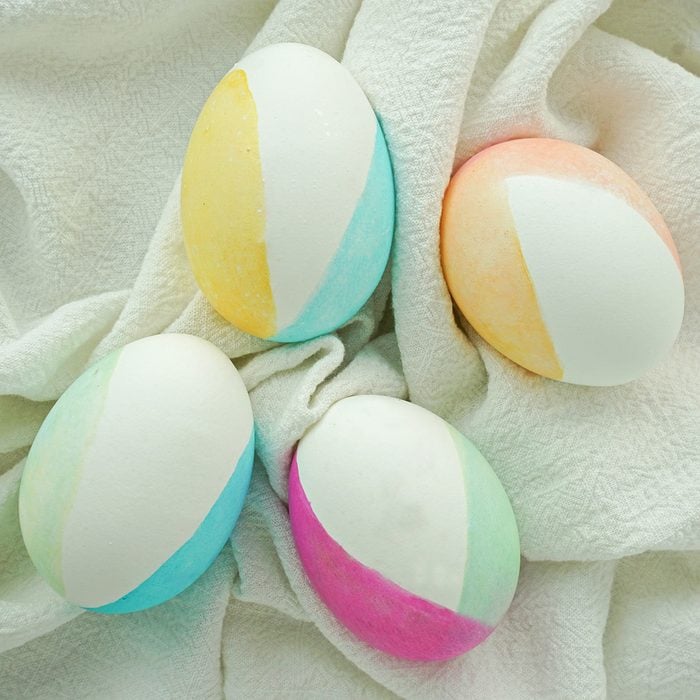
Double or Triple Dip Them
This simple technique involves dipping your eggs in multiple dyes at different angles to create beautiful two-tone designs. You can also partially dip the eggs into the same color several times at different angles to layer progressively deeper shades of color, which gives an ombre effect.
22
/
31
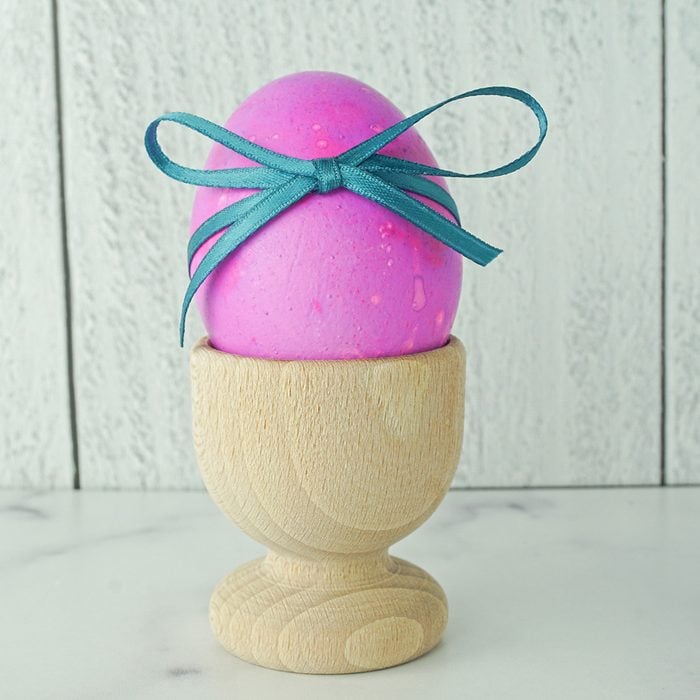
Add Colorful Ribbon
A simple way to dress up basic Easter eggs is to tie a thin ribbon around the middle of each egg. This would be a cute idea for place settings if you combine it with the calligraphy eggs.
23
/
31
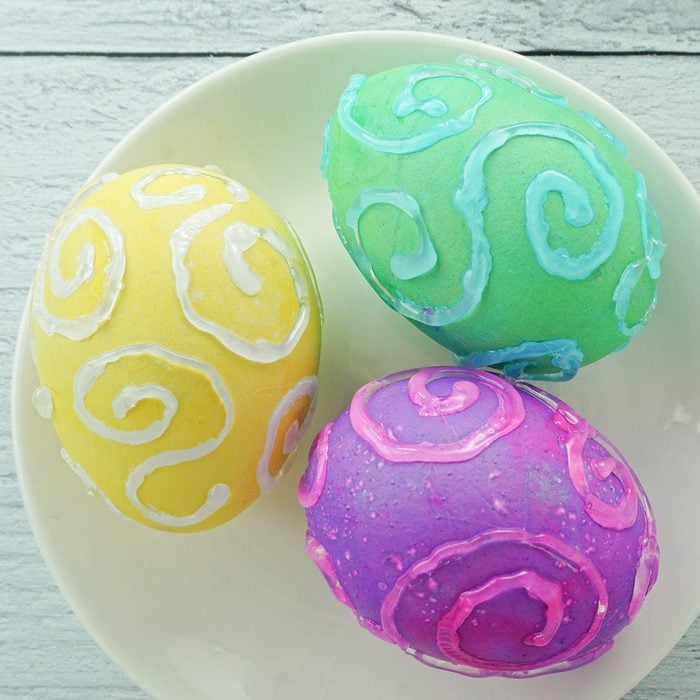
Fire Up the Hot Glue Gun
These swirly designs are made by adding hot glue to the surface of the eggs. First, dye the hard-boiled eggs as desired (or start with white eggs). Then, carefully add abstract swirls on the surface of the egg using the hot glue. Let the glue harden, and then dip the eggs into dye again. Remove and let dry.
24
/
31
Add Puffy Paint
While these eggs are not safe to eat, they are super fun. Grab a few bottles of puffy paint from the craft store and decorate your Easter eggs with an array of dimensional designs that add texture and color. You can either dye your Easter eggs first or skip the dye altogether and let the puffy paint be your method for color.
25
/
31
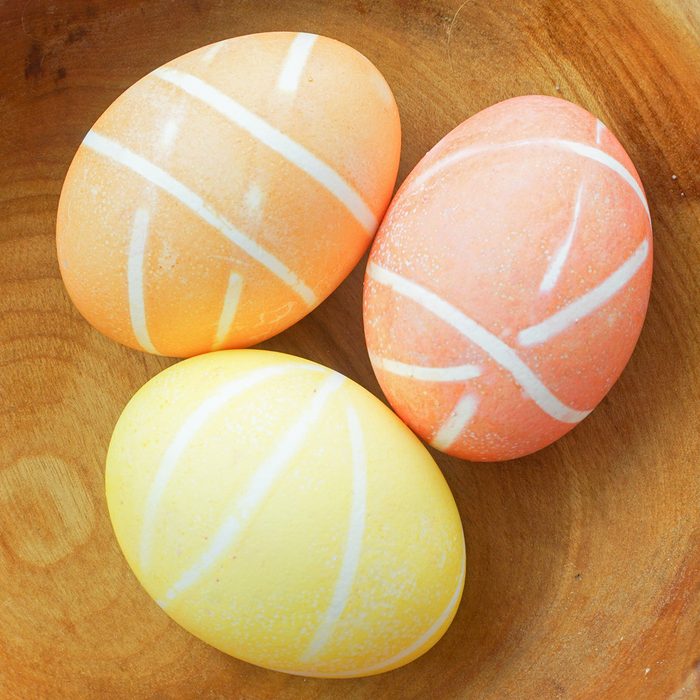
Wrap Them in String or Rubber Bands
String and rubber bands are two everyday objects from your junk drawer that you can use to create some really beautiful Easter eggs. Wrap the eggs in string and/or rubber bands at various angles and then dip into the dye. From here you can either remove the string and bands or add more and dip them again to layer on more color.
26
/
31
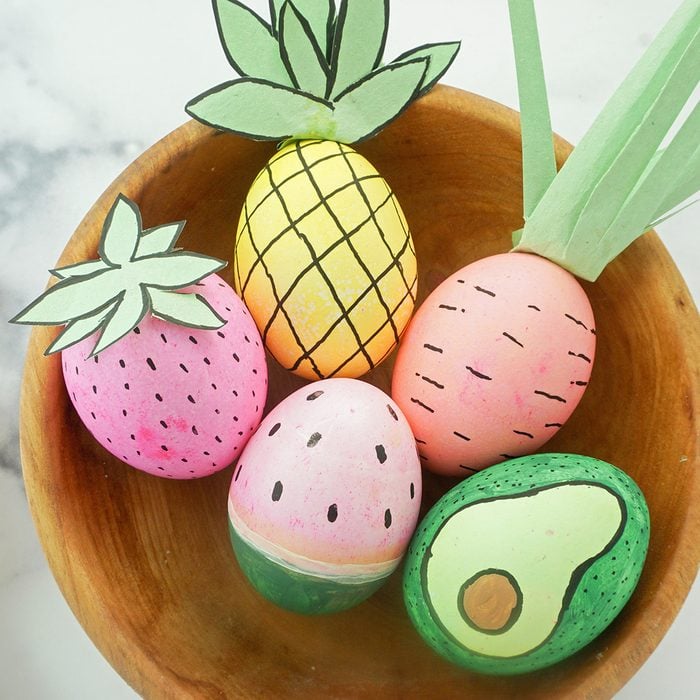
Transform Them into Fruits
First, dye the eggs in shades of red, green, yellow, pink and orange and let them dry. Then, attach leaf and stem cutouts from green construction paper with a bit of glue. Finish by using a black marker or paint to add seeds or other fruity details.
27
/
31
Make a Baking Soda and Vinegar Experiment
If you have children who love science, this technique from Toddler Approved is for you. Kids will love coating the eggs in the colorful baking soda paste and then watching as the eggs erupt like volcanos when vinegar is poured over the top, revealing their unique creations.
28
/
31
Sprinkle Them with Glitter
While glitter is horrendously messy, there’s no denying that it really makes Easter eggs shine. If you don’t intend to eat the eggs, you can use craft glitter and a bit of Mod Podge to add some sparkle to your eggs. If you want to eat your Easter eggs, then consider sourcing edible glitter dust (one of our favorite edible cake decorations). After dying the eggs, rub the eggs with a few drops of olive oil and then brush on the edible glitter dust.
29
/
31
Speckle Them with Rice
If you have young children who love a good sensory activity, grab a bag of rice and use it to create gorgeous speckled eggs. You can read more about this technique at On My Kid’s Plate. As a bonus, once you let the colorful rice completely dry, you can let your kids play with it in a sensory bin.
30
/
31
Layer Them with Rubber Cement
We love the bold designs you can create on Easter eggs by drizzling rubber cement over them. This simple technique from Capturing Parenthood is fun for kids and adults alike. Just keep in mind that rubber cement isn’t food-safe, so this technique is best if you don’t intend to eat your Easter eggs.
31
/
31
Make Edible Watercolor Paint
For beautiful color-blocked eggs, make food-safe watercolor paint with vodka and liquid food dye. A plastic paint palette is the perfect tool; adding 1 teaspoon of vodka to each well and then one to two drops of color. Use paint brushes (preferably new ones free of old paint) to brush on any design your heart desires.